a very long post
ok, here goes. this is a compilation of all the posts meant for the baked goods from 4th to 10th july. (the posts are typed here as-is on the day i wrote them, so there are some weird tenses around.)
4th july. caramel wholemeal bread pudding
 this is really just an adaptation from nigella’s caramel croissant pudding – i only had wholemeal bread on hand, and those were quite stale, so they were no good for anything else but this.


 heating the sugar. from simple syrup to golden to amber caramel. the problem was, i think i went too far and the caramel was overcooked. the taste of the end product told me so.
 this is the caramel custard mixture, which really frothed up when i poured in the milk. so, if you work with sugar, be careful when adding other liquids to a caramel because it’s burning hot. to reduce the spattering, make sure the liquids you add are already warmed up.

 soaking and baking the pudding. unlike the other bread puddings i've made, this one didn’t puff up spectacularly. still, i expected a very fulfilling dinner from it.
 the proof of the pudding is in the eating. nope, it didn’t taste nice. not sweet at all; it had a prominent bitterness in both smell and taste. that was when i gathered that the caramel must have been overcooked.
4th july. breed: a lesson on pre-ferments
like i said, this weekend is a long one, so i'm making a fermented white dough.
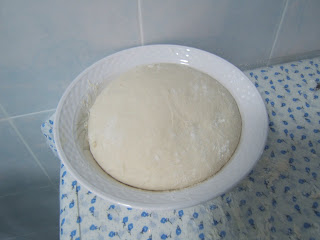
 this is the white dough made and kept in the refrigerator. i pinched off a chunk of it to make the baguettes; the rest will be left to ferment and refreshed over the next few days, hopefully developing greater flavour.
i've started reading jeffrey hamelman’s bread and from there i've finally learnt the different types of pre-ferments.
this type of pre-ferment is called a pâte fermentée – literally, ‘old dough’. and that’s just that: a piece of dough reserved from the previous batch to be incorporated into the next. what is done is to knead this old dough into a new mix, and then reserve a piece of that new dough to be used as the pate fermentee for the next bake. what i'm doing is slightly different, though. i'm going to be refreshing this same dough over the next few days, cutting out chunks of it once in a while to use for baking.
the pre-ferment used for the 100% wholemeal bread, the poolish, is a mixture of equal weights of flour and water, with very little yeast added. the effect is to increase the extensibility of the dough, making it easier to shape, and increases the loaf volume as well.
the last type, which i've yet to use, is the biga, which is a generic italian term for ‘pre-ferment’. it can be made with hydration ranging from 50 to 100%; it’s just a mixture of flour, water, and a little yeast, but no salt.
(the sourdough is not really a pre-ferment. it's a levain.)
 isn’t this cute! this was after one night in the refrigerator. the big blob of air bubble rising through the dough, stretching it into such a thin film. anyhow, i’m keeping it alive now by feeding and refreshing it once in a while.
4th july. baguettes
 these are mini baguettes made with a simple white dough formula, from bertinet.

 so, this is the white dough used for the baguettes, worked and left to rest for one hour. i’m beginning to get used to the fact that, maybe, bertinet’s dough is just not supposed to come together like nigella’s. perhaps it’s because a difference in hydration.


 divided, shaped, and left to prove for another hour. ok, so this was my first attempt at making baguettes; they don’t look they way they should. and, my oven was too small to bake all four at one go. in fact, my baking sheet was limiting the length of the baguettes.

 attempt no.1: the first two to go into the oven were not well-scored. but no matter, i've found the trick – just use the other hand to hold on to the dough while scoring.

 attempt no.2: much better scoring. on top of that, i was much more confident with the oven timing, so i let it really brown on top, and it looked really nice.
 you can see that the first batch clearly – and literally – pales in comparison to the second batch. i just love the scoring pattern etched into the caramelised flour on the surface. the baguettes smelled really nice, and even though the crust was really crusty, i could feel the softness of the bread inside. just press gently into the baguette, and it springs back.
 true enough, the baguette was permeated with many holes, or at least compared to the previous breads i made. (can't wait to see how the breads made with the fermented dough will look like! hope it doesn’t die on me; i'll be making my own breads.)
5th july. baguettes with fermented dough
the thing that confuses me is what really defines a baguette, because bertinet himself gives many different recipes for baguettes: a plain one, one with fermented dough, one with a poolish… so what makes a baguette a baguette? and by extension, what defines a ciabatta, a focaccia? is it the formula of the dough? is it the shape?
 anyway, so this is a piece of the fermented white dough – the pâte fermentée, to be mixed into the rest of the ingredients.

 the recipe also made use of the autolyse method. this is done by simply mixing the water with the flour only first, and leaving it to rest for some time. during this short rest period, the flour gets fully hydrated, as you can see from the two photos above, and mixes with the yeast and salt to form a dough much faster.
 i made this dough in the afternoon and left it to rest in the refrigerator, so as to lessen my workload in the night. very nigella.
 divided, shaped, proved, then scored. i think these looked much better than those yesterday; I was more patient with the shaping process.


 from oven to wire rack. i really love how these turned out. just look at how the scores stretched open as the baguettes expanded; from shiny, wet dough, to a golden, crisp crust.
6th july. pain façon beaucaire
this morning i took out what remained of my white dough ferment, and mixed it into a fresh batch of white dough. then i cut out one portion of it to make the pain façon beaucaire.
 don’t they look pretty? if you look hard enough, you can see that there’s a brownish rubble lining the inner circle. that’s wholemeal flour. i think it could look even more stunning with maize flour; the inner circle would be white, like the outside.


 dusted with the wholemeal flour, rolled up, and left to prove. i always have a problem with rolling up bread doughs. i just can’t get a proper rectangle to start of with, so subsequently i can’t roll the thing up nicely without tapering ends.
 cut the roll into slices, and opened them up to reveal the wholemeal flour inside. the last two pieces were the tail ends. couldn't find the opening to the wholemeal flour for those.


 i like how the wet inner dough makes a stark contrast with the floured outer dough, and eventually gives you a golden crust set against a dusty white ring around the roll.
 i couldn’t resist the temptation to break into one of the tail pieces. and surprise, look at how thin the crust is, how airy the bread is inside. i think the dough ferment is working its magic!
7th july. free-form: a lesson on pie dough
 look at how nice the crust of this apple pie is. you would think that a pie implies baking prowess. and it does (for those who are new to it). i thought so too when i first started making them. the truth is, it’s not that difficult to make a pie. i know, the thought of making pie dough from scratch seems daunting, but it really gets easy once you try it again and again.
it was a rainy and cold day today, and that’s about the best weather condition i can ask for to make a pie. to be honest, i never planned to make a pie until year-end. (waiting for the monsoon season, you see.) but i was tempted. i had just the right ingredients on hand. i had apples in the refrigerator. what's more? it’s a perfect setting: serving up a warm pie on a cold day. i can’t tell you how excited i was; just had the sudden urge to make pie.
 to make pie dough, we use a simple formula: one part butter to two parts flour (by weight). that is, if you use 100g butter, use 200g flour. the method to make the dough is the rubbing mixing method, which is explained here.
 to make it easier for you to produce a good crust, give the flour and butter a quick blast in the freezer before you start the rubbing process. now, depending on what type of pie crust you want – flaky or mealy – rub the butter to different sizes. for mealy pie crust (ideal for pies with liquid fillings or cooked fruit fillings), the bits of butter should be evenly small. for flaky pie crust (ideal for pies filled with fruit or non-liquid fillings), leave some bits of butter in larger pieces, about the size of a small pea.
after rubbing in the butter, use absolutely cold water to bring the dough together; it prevents the starch in the flour from swelling and turning gummy. and use the bare minimum amount of cold water required; you don’t want to develop too much gluten.
 after the dough is formed, divide it if needed and leave in the refrigerator to rest. this allows the gluten to relax, so that rolling out the pie dough will be easy. hmm, i love the familiar smell of the buttery dough in my fingers, the feeling of holding cool pie dough.
 after the dough has been rested for a good twenty minutes, roll it out into a circle big enough and line your pie pan with it. for my apple pie today, i decided to go free-form, so i set my base directly on the baking sheet. to roll out the dough, lightly flour your work surface if you are going to place the dough directly on it. a marble rolling board can also help a great deal, because the marble stays cooler than the surroundings. you just don’t want the dough to warm up too much as you roll it. for me, i like to roll it between two sheets of plastic, but two sheets of parchment paper work as well; it does away with the flouring of the tabletop. at any point in time, if you feel the dough is starting to get sticky, immediately return it to the refrigerator for a good rest. in fact, i should say, as long as your pie is not in the oven, leave it in the refrigerator unless you’re in the process of assembling it. (probably explains why pastry kitchens outside are air-conditioned.)

 mounted the apples onto the centre of the pie, and covered with the other circle of pie dough. sealed the edges together by pressing with the tines of a fork, a process called crimping. if you are making a double crust pie, here are some suggestions for the top crust: make a lattice top; cut out decorative shapes and set the dough over the pie; set the dough over the pie and then make a few slashes. the idea is to create some vents for the steam in the pie to escape. otherwise, you risk the top crust bursting open.
 so that’s my final pie. i like my own fluting work: it’s a pre-emptive strike against the possibility of the pie filling oozing out and flowing all over. slashed the top three times, and decorated with little apples at the side (though they look quite like the vulgar sign language). brush your pie with egg wash to give it a golden brown colour when it is baked. sprinkling sugar on top makes for a shiny and crunchy crust.
it didn’t occur to me, until much later, that i actually managed to assemble the pie much faster than i used to, and without feeling any bit flustered. like i said, the more you try it, the less difficult you will feel pie-making is. and the fluidity in movement becomes quite natural. some advice: don’t switch on the oven until you have made your pie dough; in fact you could even assemble the entire pie first, then keep it in the refrigerator while pre-heating the oven. the point is not to let the oven warm up the kitchen.

 alas, the pretty fluted sides did not keep their shape well, and flattened out a bit. nevertheless, they still managed to trap the juices that boiled and flowed out. well, i suppose a really well-made pie should not have such flaws, but hey i wasn’t even using a pie pan. by laws of gravity, the juices must flow downwards. (in this case, out of the vents and down the sides of the pie.) but don’t worry, if you use a pie pan, the chance of the filling boiling over and flowing out is lower.
 i think nothing is more warming on a cold day than the smell of a baking pie emanating from the kitchen. well, here’s to more on-weather, on-impulse, on-feeling baking!
7th july. three styles
after the gleeful pie-making, i turned up the oven to the maximum, to start warming up the kitchen in preparation for my final bake this weekend. back to bread, i used my fermented white dough to make a bâtarde, some baguettes and epis.
bâtarde:

 also known as a torpedo, a bâtarde is simply a short and fat piece of bread with sharply tapering ends. it refers to the shape of a bread, rather than the type of bread.
baguettes:

 yes, plain old baguettes. it’s amazing that until now, i'm still typing baguettes wrongly on the first try. i keep typing b-a-g-u-e-e-…
epis:

 ah, these are supposed to look like ears of wheat. they were made from the same baguette rolls; just snip with a pair of scissors and displace the ears on either side. the thing is, i think i let the rolls prove for too long, so they were too fat when i cut them. still, this was my first try, and it wasn’t too bad anyway.
---
 well, this is for my bunk supply of bread. to go with chinrui’s campbell soup. now you can see how cute the epis are, right? believe it or not, those little ears are so sharp they pierced through my ziploc bag.
10th july. an impromptu bread
my ferment looked like it was dying, so i quickly refreshed it and took a big chunk to make my own cinnamon sugar raisin loaf. i know cinnamon and raisins are the standard pairing, but this loaf is ‘my own’ because i didn’t use any recipe to make it, save for the bread formula.

 the dough is rested and divided. i made two loaves today.

 spread the dough into rectangles. sprinkled the cinnamon sugar, and then dotted liberally with raisins.

 rolled the dough up, sealed them, tucked the ends in, and placed in the loaf tins for proving. then there was a problem: one loaf started leaking sugar syrup out. i have a feeling this came from the sugar absorbing water from the plumped raisins.
 dusted with wholemeal flour, scored, and then loaded into the oven. i liked the rising of the bread in the oven. but i didn’t know how long i should bake them. did a little trial and error.
 took them out just before the tops got burnt. but the bottom of the loaves still had sticky syrup, and the sides of the bread didn’t look baked. well, i could only wait till the next morning to find out what the bread was like.
 hmm, not too bad. the bread was baked. but the dough’s flavour did not seem to fit the bread. afterall, it was white dough. i believe a sugar- and milk-enriched dough would taste better in this bread. but i still like the look of this raisin-studded loaf.
4th july. caramel wholemeal bread pudding
 this is really just an adaptation from nigella’s caramel croissant pudding – i only had wholemeal bread on hand, and those were quite stale, so they were no good for anything else but this.


 heating the sugar. from simple syrup to golden to amber caramel. the problem was, i think i went too far and the caramel was overcooked. the taste of the end product told me so.
 this is the caramel custard mixture, which really frothed up when i poured in the milk. so, if you work with sugar, be careful when adding other liquids to a caramel because it’s burning hot. to reduce the spattering, make sure the liquids you add are already warmed up.
 soaking and baking the pudding. unlike the other bread puddings i've made, this one didn’t puff up spectacularly. still, i expected a very fulfilling dinner from it.
 the proof of the pudding is in the eating. nope, it didn’t taste nice. not sweet at all; it had a prominent bitterness in both smell and taste. that was when i gathered that the caramel must have been overcooked.
4th july. breed: a lesson on pre-ferments
like i said, this weekend is a long one, so i'm making a fermented white dough.
 this is the white dough made and kept in the refrigerator. i pinched off a chunk of it to make the baguettes; the rest will be left to ferment and refreshed over the next few days, hopefully developing greater flavour.
i've started reading jeffrey hamelman’s bread and from there i've finally learnt the different types of pre-ferments.
this type of pre-ferment is called a pâte fermentée – literally, ‘old dough’. and that’s just that: a piece of dough reserved from the previous batch to be incorporated into the next. what is done is to knead this old dough into a new mix, and then reserve a piece of that new dough to be used as the pate fermentee for the next bake. what i'm doing is slightly different, though. i'm going to be refreshing this same dough over the next few days, cutting out chunks of it once in a while to use for baking.
the pre-ferment used for the 100% wholemeal bread, the poolish, is a mixture of equal weights of flour and water, with very little yeast added. the effect is to increase the extensibility of the dough, making it easier to shape, and increases the loaf volume as well.
the last type, which i've yet to use, is the biga, which is a generic italian term for ‘pre-ferment’. it can be made with hydration ranging from 50 to 100%; it’s just a mixture of flour, water, and a little yeast, but no salt.
(the sourdough is not really a pre-ferment. it's a levain.)
 isn’t this cute! this was after one night in the refrigerator. the big blob of air bubble rising through the dough, stretching it into such a thin film. anyhow, i’m keeping it alive now by feeding and refreshing it once in a while.
4th july. baguettes
 these are mini baguettes made with a simple white dough formula, from bertinet.
 so, this is the white dough used for the baguettes, worked and left to rest for one hour. i’m beginning to get used to the fact that, maybe, bertinet’s dough is just not supposed to come together like nigella’s. perhaps it’s because a difference in hydration.

 divided, shaped, and left to prove for another hour. ok, so this was my first attempt at making baguettes; they don’t look they way they should. and, my oven was too small to bake all four at one go. in fact, my baking sheet was limiting the length of the baguettes.
 attempt no.1: the first two to go into the oven were not well-scored. but no matter, i've found the trick – just use the other hand to hold on to the dough while scoring.
 attempt no.2: much better scoring. on top of that, i was much more confident with the oven timing, so i let it really brown on top, and it looked really nice.
 you can see that the first batch clearly – and literally – pales in comparison to the second batch. i just love the scoring pattern etched into the caramelised flour on the surface. the baguettes smelled really nice, and even though the crust was really crusty, i could feel the softness of the bread inside. just press gently into the baguette, and it springs back.
 true enough, the baguette was permeated with many holes, or at least compared to the previous breads i made. (can't wait to see how the breads made with the fermented dough will look like! hope it doesn’t die on me; i'll be making my own breads.)
5th july. baguettes with fermented dough
the thing that confuses me is what really defines a baguette, because bertinet himself gives many different recipes for baguettes: a plain one, one with fermented dough, one with a poolish… so what makes a baguette a baguette? and by extension, what defines a ciabatta, a focaccia? is it the formula of the dough? is it the shape?
 anyway, so this is a piece of the fermented white dough – the pâte fermentée, to be mixed into the rest of the ingredients.
 the recipe also made use of the autolyse method. this is done by simply mixing the water with the flour only first, and leaving it to rest for some time. during this short rest period, the flour gets fully hydrated, as you can see from the two photos above, and mixes with the yeast and salt to form a dough much faster.
 i made this dough in the afternoon and left it to rest in the refrigerator, so as to lessen my workload in the night. very nigella.
 divided, shaped, proved, then scored. i think these looked much better than those yesterday; I was more patient with the shaping process.

 from oven to wire rack. i really love how these turned out. just look at how the scores stretched open as the baguettes expanded; from shiny, wet dough, to a golden, crisp crust.
6th july. pain façon beaucaire
this morning i took out what remained of my white dough ferment, and mixed it into a fresh batch of white dough. then i cut out one portion of it to make the pain façon beaucaire.
 don’t they look pretty? if you look hard enough, you can see that there’s a brownish rubble lining the inner circle. that’s wholemeal flour. i think it could look even more stunning with maize flour; the inner circle would be white, like the outside.

 dusted with the wholemeal flour, rolled up, and left to prove. i always have a problem with rolling up bread doughs. i just can’t get a proper rectangle to start of with, so subsequently i can’t roll the thing up nicely without tapering ends.
 cut the roll into slices, and opened them up to reveal the wholemeal flour inside. the last two pieces were the tail ends. couldn't find the opening to the wholemeal flour for those.

 i like how the wet inner dough makes a stark contrast with the floured outer dough, and eventually gives you a golden crust set against a dusty white ring around the roll.
 i couldn’t resist the temptation to break into one of the tail pieces. and surprise, look at how thin the crust is, how airy the bread is inside. i think the dough ferment is working its magic!
7th july. free-form: a lesson on pie dough
 look at how nice the crust of this apple pie is. you would think that a pie implies baking prowess. and it does (for those who are new to it). i thought so too when i first started making them. the truth is, it’s not that difficult to make a pie. i know, the thought of making pie dough from scratch seems daunting, but it really gets easy once you try it again and again.
it was a rainy and cold day today, and that’s about the best weather condition i can ask for to make a pie. to be honest, i never planned to make a pie until year-end. (waiting for the monsoon season, you see.) but i was tempted. i had just the right ingredients on hand. i had apples in the refrigerator. what's more? it’s a perfect setting: serving up a warm pie on a cold day. i can’t tell you how excited i was; just had the sudden urge to make pie.
 to make pie dough, we use a simple formula: one part butter to two parts flour (by weight). that is, if you use 100g butter, use 200g flour. the method to make the dough is the rubbing mixing method, which is explained here.
 to make it easier for you to produce a good crust, give the flour and butter a quick blast in the freezer before you start the rubbing process. now, depending on what type of pie crust you want – flaky or mealy – rub the butter to different sizes. for mealy pie crust (ideal for pies with liquid fillings or cooked fruit fillings), the bits of butter should be evenly small. for flaky pie crust (ideal for pies filled with fruit or non-liquid fillings), leave some bits of butter in larger pieces, about the size of a small pea.
after rubbing in the butter, use absolutely cold water to bring the dough together; it prevents the starch in the flour from swelling and turning gummy. and use the bare minimum amount of cold water required; you don’t want to develop too much gluten.
 after the dough is formed, divide it if needed and leave in the refrigerator to rest. this allows the gluten to relax, so that rolling out the pie dough will be easy. hmm, i love the familiar smell of the buttery dough in my fingers, the feeling of holding cool pie dough.
 after the dough has been rested for a good twenty minutes, roll it out into a circle big enough and line your pie pan with it. for my apple pie today, i decided to go free-form, so i set my base directly on the baking sheet. to roll out the dough, lightly flour your work surface if you are going to place the dough directly on it. a marble rolling board can also help a great deal, because the marble stays cooler than the surroundings. you just don’t want the dough to warm up too much as you roll it. for me, i like to roll it between two sheets of plastic, but two sheets of parchment paper work as well; it does away with the flouring of the tabletop. at any point in time, if you feel the dough is starting to get sticky, immediately return it to the refrigerator for a good rest. in fact, i should say, as long as your pie is not in the oven, leave it in the refrigerator unless you’re in the process of assembling it. (probably explains why pastry kitchens outside are air-conditioned.)
 mounted the apples onto the centre of the pie, and covered with the other circle of pie dough. sealed the edges together by pressing with the tines of a fork, a process called crimping. if you are making a double crust pie, here are some suggestions for the top crust: make a lattice top; cut out decorative shapes and set the dough over the pie; set the dough over the pie and then make a few slashes. the idea is to create some vents for the steam in the pie to escape. otherwise, you risk the top crust bursting open.
 so that’s my final pie. i like my own fluting work: it’s a pre-emptive strike against the possibility of the pie filling oozing out and flowing all over. slashed the top three times, and decorated with little apples at the side (though they look quite like the vulgar sign language). brush your pie with egg wash to give it a golden brown colour when it is baked. sprinkling sugar on top makes for a shiny and crunchy crust.
it didn’t occur to me, until much later, that i actually managed to assemble the pie much faster than i used to, and without feeling any bit flustered. like i said, the more you try it, the less difficult you will feel pie-making is. and the fluidity in movement becomes quite natural. some advice: don’t switch on the oven until you have made your pie dough; in fact you could even assemble the entire pie first, then keep it in the refrigerator while pre-heating the oven. the point is not to let the oven warm up the kitchen.

 alas, the pretty fluted sides did not keep their shape well, and flattened out a bit. nevertheless, they still managed to trap the juices that boiled and flowed out. well, i suppose a really well-made pie should not have such flaws, but hey i wasn’t even using a pie pan. by laws of gravity, the juices must flow downwards. (in this case, out of the vents and down the sides of the pie.) but don’t worry, if you use a pie pan, the chance of the filling boiling over and flowing out is lower.
 i think nothing is more warming on a cold day than the smell of a baking pie emanating from the kitchen. well, here’s to more on-weather, on-impulse, on-feeling baking!
7th july. three styles
after the gleeful pie-making, i turned up the oven to the maximum, to start warming up the kitchen in preparation for my final bake this weekend. back to bread, i used my fermented white dough to make a bâtarde, some baguettes and epis.
bâtarde:

 also known as a torpedo, a bâtarde is simply a short and fat piece of bread with sharply tapering ends. it refers to the shape of a bread, rather than the type of bread.
baguettes:

 yes, plain old baguettes. it’s amazing that until now, i'm still typing baguettes wrongly on the first try. i keep typing b-a-g-u-e-e-…
epis:

 ah, these are supposed to look like ears of wheat. they were made from the same baguette rolls; just snip with a pair of scissors and displace the ears on either side. the thing is, i think i let the rolls prove for too long, so they were too fat when i cut them. still, this was my first try, and it wasn’t too bad anyway.
---
 well, this is for my bunk supply of bread. to go with chinrui’s campbell soup. now you can see how cute the epis are, right? believe it or not, those little ears are so sharp they pierced through my ziploc bag.
10th july. an impromptu bread
my ferment looked like it was dying, so i quickly refreshed it and took a big chunk to make my own cinnamon sugar raisin loaf. i know cinnamon and raisins are the standard pairing, but this loaf is ‘my own’ because i didn’t use any recipe to make it, save for the bread formula.

 the dough is rested and divided. i made two loaves today.
 spread the dough into rectangles. sprinkled the cinnamon sugar, and then dotted liberally with raisins.
 rolled the dough up, sealed them, tucked the ends in, and placed in the loaf tins for proving. then there was a problem: one loaf started leaking sugar syrup out. i have a feeling this came from the sugar absorbing water from the plumped raisins.
 dusted with wholemeal flour, scored, and then loaded into the oven. i liked the rising of the bread in the oven. but i didn’t know how long i should bake them. did a little trial and error.
 took them out just before the tops got burnt. but the bottom of the loaves still had sticky syrup, and the sides of the bread didn’t look baked. well, i could only wait till the next morning to find out what the bread was like.
 hmm, not too bad. the bread was baked. but the dough’s flavour did not seem to fit the bread. afterall, it was white dough. i believe a sugar- and milk-enriched dough would taste better in this bread. but i still like the look of this raisin-studded loaf.
posted by ivan at 2:05 AM
![]()


2 Comments:
Hi Ivan! Wow I've never dare to try bread-making as I find it pretty scary (I have no idea why the fear comes from but probably because of the effort you have to put in into bread-making).
And just like you, I would love for my own kitchen with a HUGE HUGE marble-top counter and a BIG BIG oven to fill the whole house with the aroma of my baked-goods.
Ooh and I LOVE cinnamon! So the cinnamon loaf is my favourite! It looks yummy! :D
ah... the fear of hard work for bread making. well, you just have to try it for the first time, and feel the magic when the dough becomes alive in your hands!
Post a Comment
<< Home